Yes, I'm learning to ride "Wild Donkeys." Not literally, I'm afraid, as fun as that sounds. I've recently read Leonie Dawson's blog about the creative technique of riding "wild donkeys," and it's just as much fun as the real thing.
You will find her "Wild Donkey" technique right here!
http://leoniedawson.com/
But basically, the Wild Donkey technique is a technique for getting your creative ideas from drawing board to finished production.
Instead of planning, thinking, considering, etc, waiting for inspiration, imagine your idea is a wild donkey who's come to the paddock in your head. The thing to do is put on your cowboy/girl hat and ride that thing like the wind! Get out what you need to do it and do it! While the creative energy is flowing, harness that energy and
Create!
Until the end. Then instead of having a very well thought out idea, you've got a finished work of art that can then be set free to bring joy to the world! So it doesn't match your idea exactly. So what! It will have life and energy and dynamics that a 'well thought out' idea will lack.
 And that's what I'm doing. Riding the Wild Donkey. And the current Donkey is coloured pencils.
I love coloured pencils! Do you love coloured pencils? I LOVE coloured pencils!
Maybe not as vigorously as this little chap. Yes, I deleted the words. You know what they are.
Pencils!
I've got a lovely set of Prismacolor coloured pencils. They are soft and creamy and bright, bright, bright!
Link!
http://www.prismacolor.com/home
I think they are lovelier than the well known derwent. Derwent used to be the name drop to use. But I find them a bit waxy and they don't blend as nicely as Prismacolor. And their color is not as intence. Some of their other products might be alright. I haven't tried the Derwent pastel pencils yet. I'll wait till that Donkey comes into my paddock first.
I've also tried the artist quality Faber castell and they are lovely too. But Prismacolor is what I've got, so that's where I'll stay.
Paper!
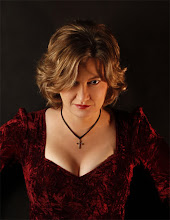
I love my colour pencils. Though I don't like the paper I've got right now. I've been using good old cartridge, I've even found heavier cartridge than usual, and it's quite good. But nothing so lovely as cold-pressed cotton paper. Try Stonehenge. It is beautiful for building your layers. My red wine pic was done like that. And here it is again.


You will find her "Wild Donkey" technique right here!
http://leoniedawson.com/
But basically, the Wild Donkey technique is a technique for getting your creative ideas from drawing board to finished production.
Instead of planning, thinking, considering, etc, waiting for inspiration, imagine your idea is a wild donkey who's come to the paddock in your head. The thing to do is put on your cowboy/girl hat and ride that thing like the wind! Get out what you need to do it and do it! While the creative energy is flowing, harness that energy and
Create!
Produce!
Make!
Until the end. Then instead of having a very well thought out idea, you've got a finished work of art that can then be set free to bring joy to the world! So it doesn't match your idea exactly. So what! It will have life and energy and dynamics that a 'well thought out' idea will lack.
 And that's what I'm doing. Riding the Wild Donkey. And the current Donkey is coloured pencils.
I love coloured pencils! Do you love coloured pencils? I LOVE coloured pencils!
Maybe not as vigorously as this little chap. Yes, I deleted the words. You know what they are.
Pencils!
I've got a lovely set of Prismacolor coloured pencils. They are soft and creamy and bright, bright, bright!
Link!
http://www.prismacolor.com/home
I think they are lovelier than the well known derwent. Derwent used to be the name drop to use. But I find them a bit waxy and they don't blend as nicely as Prismacolor. And their color is not as intence. Some of their other products might be alright. I haven't tried the Derwent pastel pencils yet. I'll wait till that Donkey comes into my paddock first.
I've also tried the artist quality Faber castell and they are lovely too. But Prismacolor is what I've got, so that's where I'll stay.
- Side note: In my role as Nanny (I am many things), I'm often asked what are good color pencils for kids. I'd say good old Faber Castell every time. Not the artists quality, mostly because they are bloody expensive! (You can tell I'm poor). Your boring old variety store kind will do. They are bright and soft and you can get nice fat ones for little fingers. Then if your little one turns out to be a color pencil expert, you can graduate to artist quality.
I love my colour pencils. Though I don't like the paper I've got right now. I've been using good old cartridge, I've even found heavier cartridge than usual, and it's quite good. But nothing so lovely as cold-pressed cotton paper. Try Stonehenge. It is beautiful for building your layers. My red wine pic was done like that. And here it is again.

See how the wine glows. People think that's because I'm clever. (Well, it is, let's face it). It is because of the beautiful paper I used with my delicious prismacolor. Stonehenge is so beautifully smooth, but still with enough tooth to take the color. I find that cartridge is too rough, I can't keep the pencil where I want it!
This pic took three therapeutic hours of slowly building up the color and then burnishing it with a colourless burnishing pencil.

Here's a close up. Not that I want to give too much away, but you can sort of see how the color pencil has built up and blended. I've seen better examples myself, but I currently don't have the equipment to get a better shot. So this is the lovely stonehenge paper. Though bloody expensive! ($6 for an A1 sheet). But worth it in the end.
- Side note: "What's burnishing?" I hear you say. I'm glad you asked. When you are building layers of color you'll be starting with color on top of the tooth of the paper. The more layers you add, the further into the tooth you'll go and the less white will show. When you've finished your layers you can "burnish" your color by putting a last layer that you press fairly hard on. This will push your color completely into the tooth, covering up the white and making it lovely and glossy. You can do it with a white pencil or a pale version of the color you're using, but I love my "burnishing pencil!"
- Side note: "What's a burnishing pencil?" I hear you say. I'm glad you asked. A burnishing pencil is just like an ordinary pencil only it is all base and no pigment. You can burnish with a white pencil and what you'll get is lovely glossy pencil with the same amount of white showing as you had paper. If you use a burnishing pencil you'll burnish just the colors you have and it will stay lovely and bright. I sometimes use a pale color to burnish and get a lovely result too.
Soooooo much fun! And now I can't stop! The Donkey has run away with me! Coffee splash next, I think. . .
No comments:
Post a Comment